MikroTik CLI Config Lab: Static & Dynamic Routing

Panduan praktis konfigurasi jaringan MikroTik menggunakan perintah CLI (Command Line Interface).

Simulasi dilakukan di EVE-NG, yaitu platform virtual yang biasa digunakan untuk belajar dan menguji konfigurasi jaringan tanpa harus membeli perangkat asli.

Di sini kamu akan belajar cara mengatur routing static dan routing dinamis (OSPF) secara bertahap, mulai dari mengatur IP address, membuat loopback, hingga menguji koneksi antar-router.

Panduan ini cocok untuk pemula yang ingin belajar jaringan MikroTik secara langsung lewat terminal.

🅰️ Dasar Teori


🔁 Konfigurasi Routing Static
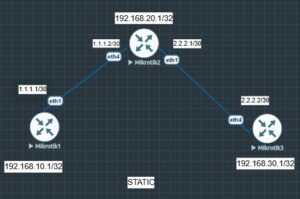
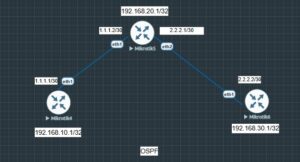
1. Topologi

  • Terdiri dari 3 router (R1, R2, R3) yang saling terhubung.

2. Set nama (identity) router

# R1
/system identity set name=R1
 
# R2
/system identity set name=R2
 
# R3
/system identity set name=R3

3. Konfigurasi IP Address per interface

# R1
/ip address add address=1.1.1.1/30 interface=ether1
 
# R2
/ip address add address=1.1.1.2/30 interface=ether4
/ip address add address=2.2.2.1/30 interface=ether1
 
# R3
/ip address add address=2.2.2.2/30 interface=ether4

4. Buat interface loopback di setiap router

/interface bridge add name=loopback0

5. Tambahkan IP loopback

# R1
/ip address add address=192.168.10.1/32 interface=loopback0
 
# R2
/ip address add address=192.168.20.1/32 interface=loopback0
 
# R3
/ip address add address=192.168.30.1/32 interface=loopback0

6. Tambahkan Routing Static (manual)

# R1
/ip route add dst-address=192.168.20.1/32 gateway=1.1.1.2
/ip route add dst-address=192.168.30.1/32 gateway=1.1.1.2
/ip route add dst-address=2.2.2.0/30 gateway=1.1.1.2

# R2
/ip route add dst-address=192.168.10.1/32 gateway=1.1.1.1
/ip route add dst-address=192.168.30.1/32 gateway=2.2.2.2

# R3
/ip route add dst-address=192.168.10.1/32 gateway=2.2.2.1
/ip route add dst-address=192.168.20.1/32 gateway=2.2.2.1
/ip route add dst-address=1.1.1.0/30 gateway=2.2.2.1

7. Uji koneksi menggunakan ping antar router

  • Tes konektivitas dari R1 ke R2 dan R3, begitu juga sebaliknya.

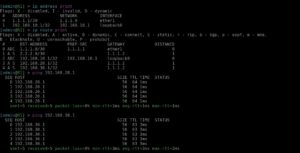
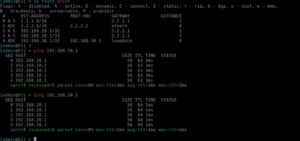
  • Pastikan semua ping berhasil.

🔁 Konfigurasi Routing OSPF

1. Topologi

  • Masih 3 router (R1, R2, R3) dengan koneksi serupa namun perlu diperhatikan penggunaan interfacenya.

2. Set nama (identity) router

# R1
/system identity set name=R1
 
# R2
/system identity set name=R2
 
# R3
/system identity set name=R3

3. Setting IP Address pada setiap interface

# R1
/ip address add address=1.1.1.1/30 interface=ether1

# R2
/ip address add address=1.1.1.2/30 interface=ether1
/ip address add address=2.2.2.1/30 interface=ether2

# R3
/ip address add address=2.2.2.2/30 interface=ether1

4. Buat interface loopback di setiap router

/interface bridge add name=loopback0

5. Tambahkan IP loopback

# R1
/ip address add address=192.168.10.1/32 interface=loopback0
 
# R2
/ip address add address=192.168.20.1/32 interface=loopback0
 
# R3
/ip address add address=192.168.30.1/32 interface=loopback0
 

6. Aktifkan interface OSPF

# R1
/routing ospf interface add interface=ether1
# R2
/routing ospf interface add interface=ether1
/routing ospf interface add interface=ether2
# R3
/routing ospf interface add interface=ether1

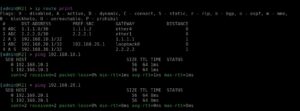
7. Tambahkan network ke OSPF

# R1
/routing ospf network add network=1.1.1.0/30 area=backbone
/routing ospf network add network=192.168.10.1/32 area=backbone

# R2
/routing ospf network add network=1.1.1.0/30 area=backbone
/routing ospf network add network=2.2.2.0/30 area=backbone
/routing ospf network add network=192.168.20.1/32 area=backbone

# R3
/routing ospf network add network=2.2.2.0/30 area=backbone
/routing ospf network add network=192.168.30.1/32 area=backbone

8. Uji koneksi menggunakan ping

  • Ping dari R1 ke R2 dan R3 untuk menge-test koneksi routing OSPF.

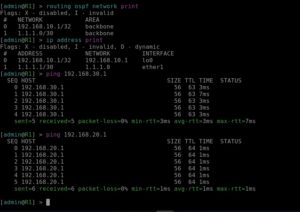
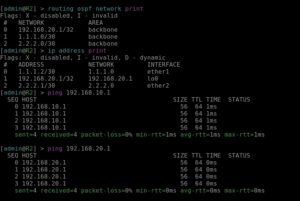
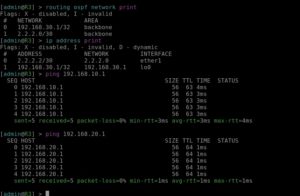
  • Pastikan ping berhasil  dan routing otomatis aktif.

Tagged with:
MikroTikrouting

Leave a Reply

Your email address will not be published. Required fields are marked *

You might also like
IRR, RPKI & PeeringDB for Operators

IRR, RPKI & PeeringDB for Operators

Sistem Informasi Berbasis Blockchain Solusi untuk Integritas Data di Era Digital

Sistem Informasi Berbasis Blockchain Solusi untuk Integritas Data di Era Digital

BGP Route Leaks Overview

BGP Route Leaks Overview